
Fast.ai Chapter 2: Augmentation, Interpretation, and exposing your models through APIs


Welcome to chapter 2 of fast.ai lecture series. In the first chapter, We created an image classifier using the fast ai library and in this chapter we will figure out the following things -
What is data augmentation and how to implement it?
How to plot the confusion matrix for your model?
Figure out the top losses for your model.
How to easily clean your data?
Exporting your trained models for using anywhere.
Publish your model on hugging face.
Expose your model through APIs to be consumed in any app.
Data Augmentation
For a computer, an image is just a grid of numbers. A picture of your cat is a matrix (2-D for greyscale, 3-D for RGB) of numbers. rotate that picture slightly, and you get a completely different matrix. While you'd still see a cat, your model might suddenly get confused. We want our models to recognize a cat whether it's perfectly posed, slightly crooked, upside-down, or peeking from the corner of the frame.
That’s where data augmentation comes in. It’s the process of creating random variations of our input data to teach our model to generalize better. We're essentially expanding our dataset for free by creating slightly modified copies—rotating, cropping, flipping, or changing the brightness of our images.
In fast.ai, we can apply these transformations in two main ways:
Item Transforms (
item_tfms): These are applied to each individual image before it's grouped into a batch. A classic example isRandomResizedCrop, which randomly crops a part of the image and resizes it to a standard size. This is great for ensuring all our images have consistent dimensions.Batch Transforms (
batch_tfms): These are applied to an entire batch of images at once, leveraging the power of your GPU for blazing-fast performance. This is where most of the "augmentation magic" happens. Theaug_transformsfunction is a powerful helper that applies a standard set of useful augmentations.
clothes = DataBlock(blocks=(ImageBlock, CategoryBlock),
        get_items=my_image_getter,
        splitter=RandomSplitter(valid_pct=0.2, seed=42),
        get_y=get_label)

clothes = clothes.new(item_tfms=RandomResizedCrop(224, min_scale=0.5),
                      batch_tfms=aug_transforms(mult=2))
Cleaning Data
Real-world data is messy. It's full of blurry pictures, incorrectly labeled images, and things that just don't belong. To build a great model, we need to be good data detectives. Luckily, fast.ai provides the ClassificationInterpretation class, a fantastic tool for this job.
Confusion matrix
Confusion matrix is NXN matrix where N is the number of categories in our model. It display how many items we categorised correctly and how many items were categorised in other categories for each category. The diagonal of course has the correctly categories items, so we want the biggest numbers in the diagonal. It gives an idea about how our model is performing and which categories are getting mixed up.
interpreter = ClassificationInterpretation.from_learner(learner)
interpreter.plot_confusion_matrix()
Finding Your Top Losses
The loss function is what our model uses during training to gauge how wrong its predictions are. The "top losses" are the images where the model was the most wrong. These are the goldmines for improving performance because they highlight a few key problems:
The image is mislabeled in the dataset. (e.g., a picture of a "6" is labeled as a "0").
The image is genuinely confusing. (e.g., a "7" that looks a lot like a "1").
The image is something unexpected. (e.g., a drawing or a blurry mess in a digit dataset).
Focusing on these top losses is often the quickest way to improve your model.
interpreter.plot_top_losses()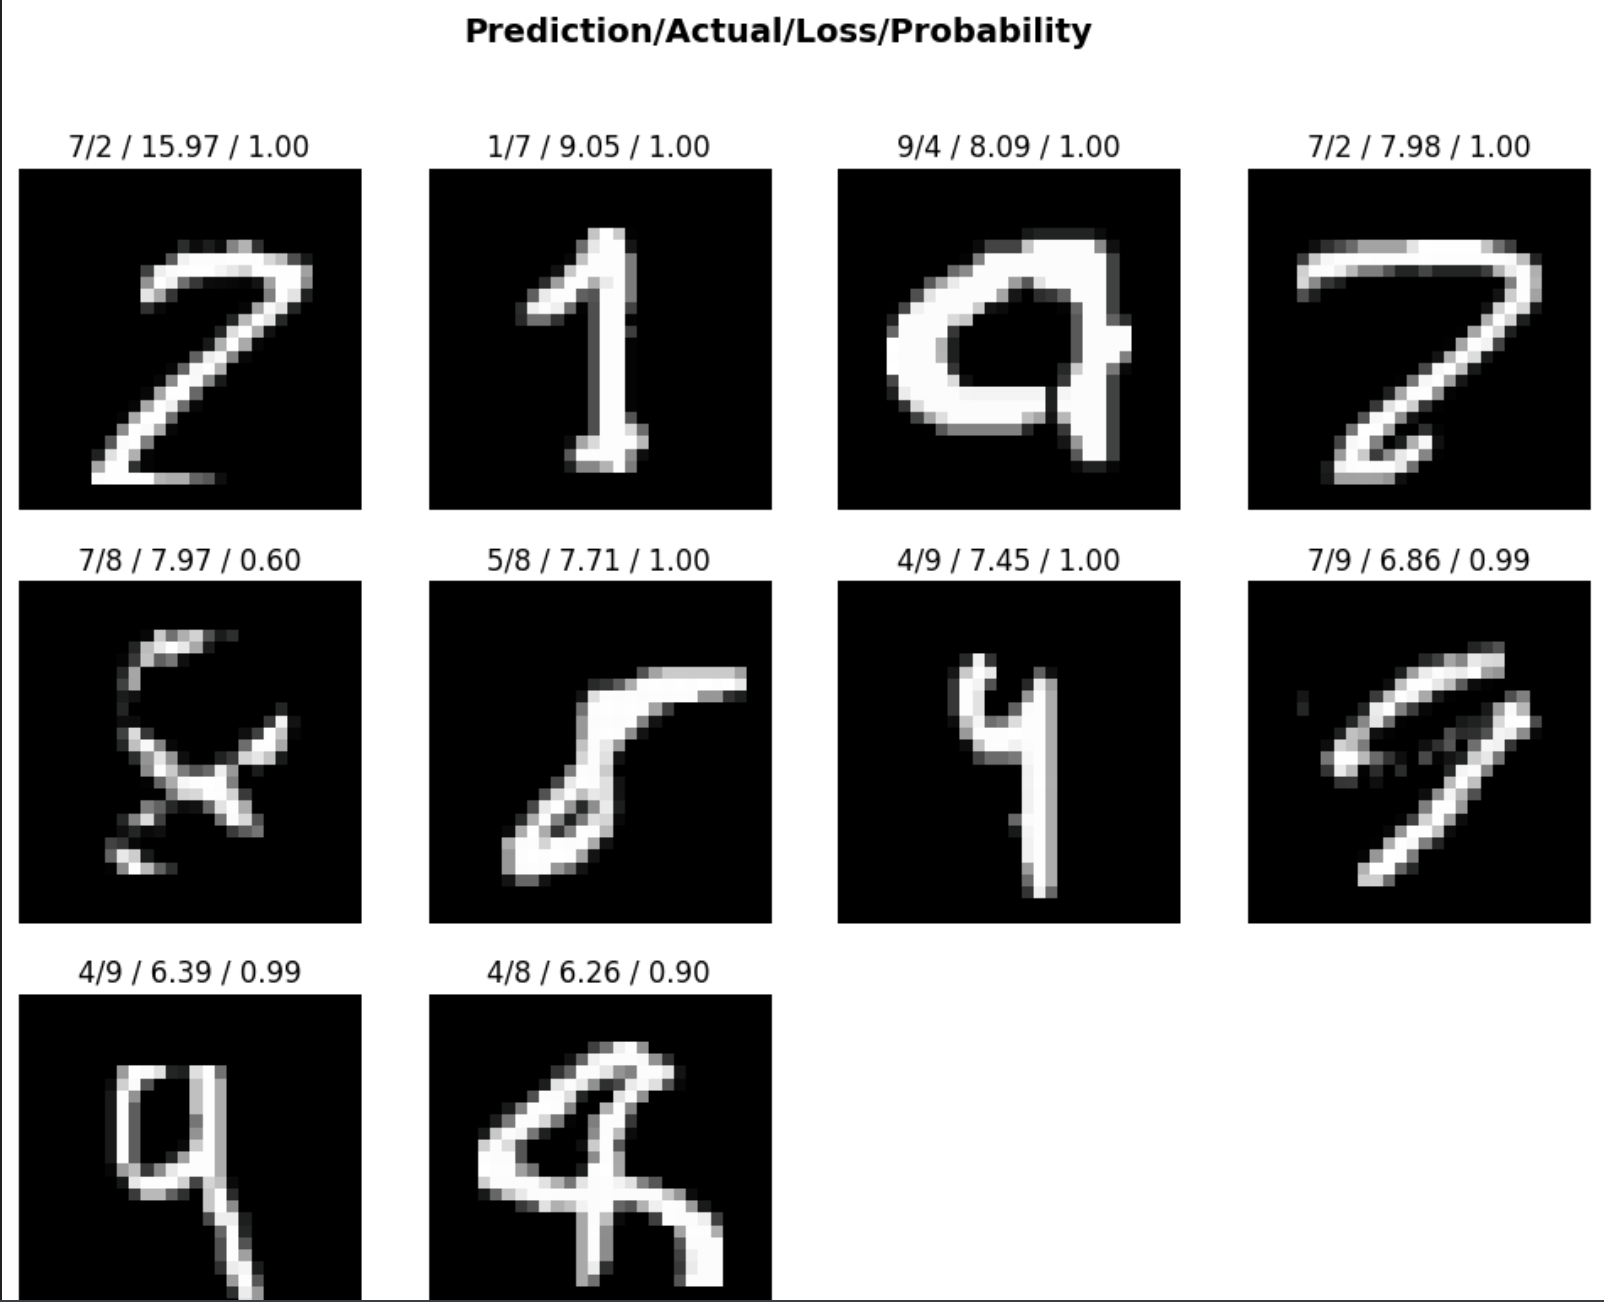
Relabelling or Deleting
Fast.ai makes acting on your top losses incredibly easy with an interactive widget. This tool displays the images with the highest loss from your training and validation sets and lets you decide what to do with them.
For each problematic image, the widget gives you a dropdown menu. You can choose to:
Keep it as is.
Delete it if it's irrelevant or junk.
Relabel it to the correct category.
For instance, if you find a handwritten "0" that was mistakenly labeled as a "6", you can change its category right there. Once you're done, you can programmatically apply these changes.
from fastai.vision.widgets import *
cleaner = ImageClassifierCleaner(learner)
cleaner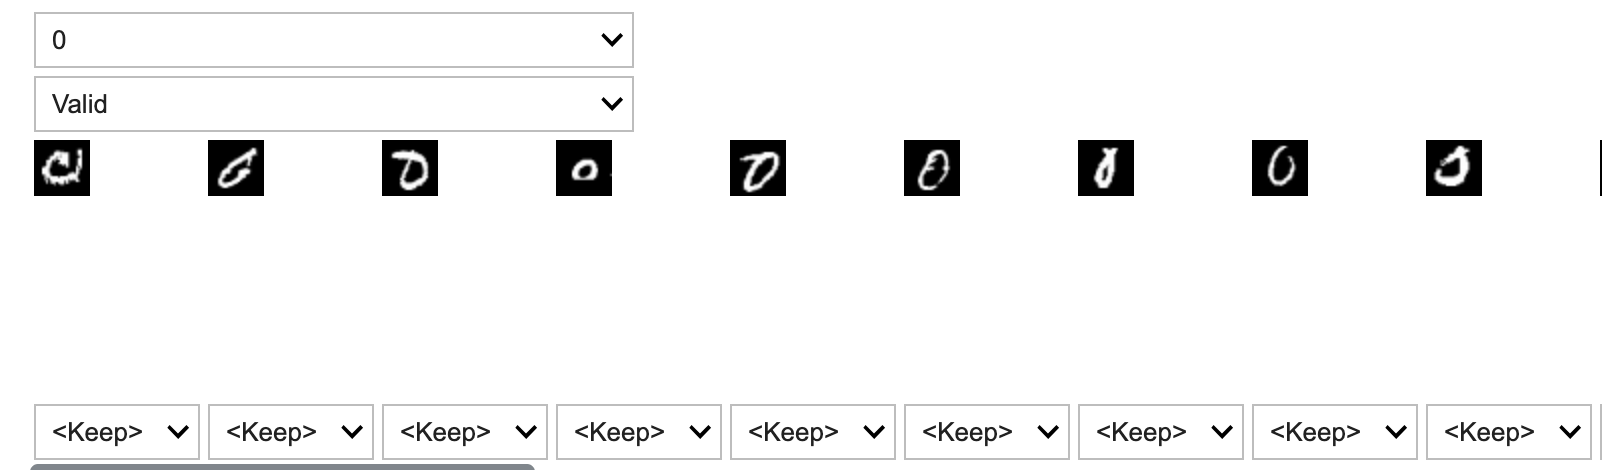
As you can see the `cleaner` is showing 2 dropdowns. First, let us choose the category for which we want to display the top losses. Second one let use choose between the training and validation set. For each of the top losses, we can choose to keep, relabel as other category and delete. e.g. The first figure does not look like any digit to me, so I can choose to delete it, While I can relabel the second as a 6 rather than 0.
# For Deleting
for idx in cleaner.delete():
    cleaner.fns[idx].unlink()

# For changing label
for idx, cat in cleaner.change():
    # change label code like renaming, changing folder or updating csv
A Quick Detour: Why We Train on Loss, Not Accuracy
You might wonder, "If our goal is high accuracy, why don't we just tell the model to maximise accuracy?"
It's a great question! The reason is that accuracy is a poor gradient for learning. Our model doesn't just output a "yes" or "no." It outputs probabilities. Imagine our bird-vs-forest classifier sees a bird and predicts:
Bird: 0.4,Forest: 0.6
The final prediction is "Forest," so it's wrong. Accuracy is 0%. After one training step, the weights are adjusted, and the new prediction is:
Bird: 0.45,Forest: 0.55
The prediction is still "Forest," so the accuracy hasn't changed. It's still 0%. But the model has learned something! It's now slightly more confident that the image might be a bird. The loss function is sensitive enough to capture this tiny improvement, whereas accuracy is not.
Think of loss as a smooth, rolling hill we can descend, while accuracy is a jagged staircase. It's much easier for our model to figure out which way is "down" on the hill. However, always remember that minimising loss is the means to an end—our ultimate goal is still to achieve the best possible accuracy.
Exporting your model
Once you have trained your model, all the weights have been set and the model is no different than any other computer program. It can be run anywhere without the need of expensive GPU resources just like any other app running in your local computer or cloud. We can easily export our model with a single line of code.
learner.export('digit_recogniser.pkl')Hugging face and Gradio
Hugging face spaces is one the easiest way to host your model for testing purpose. You can think of hugging face spaces as an app store for AI/ML models where you can find millions of models published by other people as well as publish your own for free. Below are the steps to publish your app on hugging face spaces -
visit hugging face website and create your account.
Click spaces and then click “Create new space.”
Fill all the details including name, license, space sdk, hardware etc.
You can pick Apache or MIT license, Gradio as space (Blank template) and use free CPU/GPU.
You can clone the code of newly created repo using Git clone or Hugging face cli.
You can also directly upload or create files by going the files tab on HF website.
Create a requirements.txt file to install the dependencies.
Upload your model and update the app.py file to publish your app.
from fastai.vision.all import *

learn = load_learner('digit_recogniser.pkl')
labels = learn.dls.vocab
def predict(img):
    img = PILImage.create(img)
    pred,pred_idx,probs = learn.predict(img)
    return {labels[i]: float(probs[i]) for i in range(len(labels))}


import gradio as gr
gr.Interface(
    fn=predict,
    inputs=gr.Image(type="pil"),
    outputs=gr.Label(num_top_classes=3)
).launch()
You can find a detailed tutorial on Hugging face + Gradio on Tanishq’s blog.
Exposing the APIs
The hugging face creates the API automatically for you to be consumed by an app. Click on the link “use via API” given at the bottom of your model’s running page. It will display the APIs you can use to integrate your model.
My Experiments and What broke down
I decided to build a handwritten digit recogniser using MNIST dataset. Handwritten digit recogniser is one of the first deep learning applications which fuelled the growth in AI that we see today.
ipwidgets - you will need to add ipwidgets in your requirements.txt on the hugging face. You will need them to render the UI.
load_learner - load_learner function has been removed from the fastai library. So, either fix the version of fastai library to fastai==2.7.19 or less in your requirements.txt or use any other learner like cnn_learner. I would recommend to go with fastai 2.7.19.
You can check the code on Image recognition and cleaning dataset in this notebook.
Wrap up
Well that’s a wrap up for lesson 2.
Here’s a quick recap of what we covered:
Data Augmentation: How to make your model tougher and smarter by showing it warped, flipped, and cropped images.
Model Interpretation: Using the
ClassificationInterpretationclass to plot aconfusion_matrixand find thetop_losses.Data Cleaning: We used the interactive
ImageClassifierCleanerto fix mislabeled data, which is one of the fastest ways to improve performance.Deploying Your Model: We learned how to
exportour learner and bring it to life on Hugging Face Spaces with a slick Gradio UI.
P.S. If you enjoyed this post, consider subscribing to my mailing list. I’ll be writing one blog for each chapter of the Fast.ai course, along with my experiments, as wells as on career advice and startups.
Don’t worry—I won’t spam you with cat memes… unless you’re into that 🐱. Just practical insights, resources, and maybe a joke or two to keep things fun.